Tile Leveling System F.A.Q
Tile leveling systems are more than just for professional tilers. Everyone is using them now to create beautiful tiled surfaces without lipping issues.
Unfortunately, there is a distinct lack of information on how to use these kits properly and it’s no surprise there are plenty of questions!
This article is here to answer the most common tile leveling questions from across the web.
• how to remove tile leveling clips
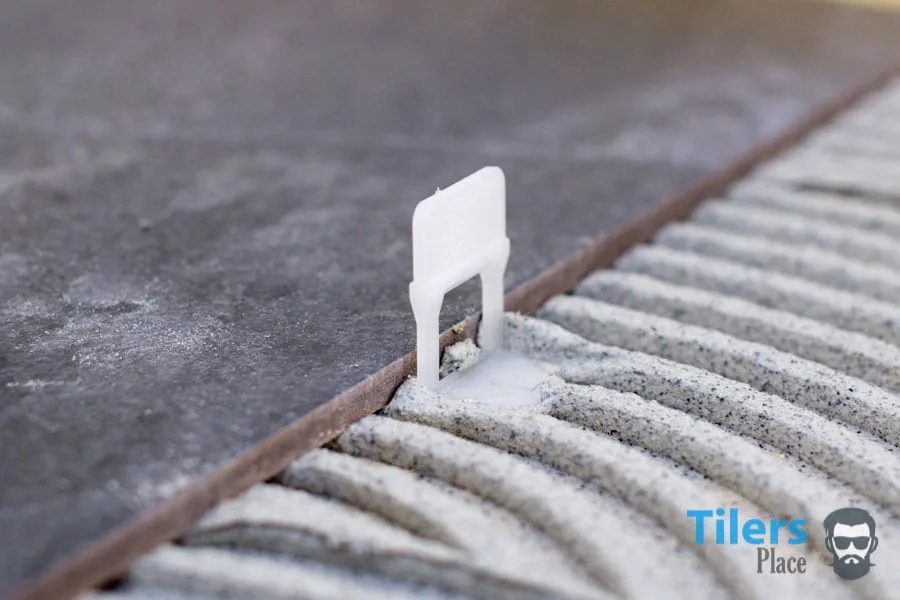
Here’s one that I see mentioned a lot online, ‘how do I remove tile leveling system clips without it breaking inside the grout line?’
This question arises mostly from the first time users of these leveling systems and those using a cheap tile leveling system and not the best tile leveling gear on offer.
Apart from that, it happens because they haven’t learned the best way of removing the wedge when they are getting the tiles ready for grouting.
What happens is they kick out the wedge and the plastic clip snaps above the floor tile or just high enough for it to stick out during grouting.
Resulting in a time-consuming task of cutting out the plastic from the grout line before grouting.
We ain’t got time for that nonsense!
The idea behind removing tile levelers is simple**;** strike the plastic at the base where it meets the tiled surface. Don’t hit high, or at the wedge/disk.
Check my how to use tile leveling systems guide for more instructions!
AIM FOR THE BOTTOM OF THE TILE LEVELING CLIP
How you do it is up to you, but for floor clips, I just walk in and kick them out with my boot. My foot kind of skims the surface of the tile as I am aiming for the bottom of the clip, where the most force will transfer to the breaking point beneath the tile.
You can use a rubber mallet as well and it is recommended for tile clips used on walls for obvious reasons. (We can’t walk on walls sadly. Gravity sucks huh.)
Also, try do it with a short but sharp motion, like you would kick a car tire at a sales yard.
A nice, quick kick will ensure the top part of the clip comes off cleanly from the base and you can just sweep up the parts after.
Easy!
After you get the motion down you will never have trouble removing tile clips again.
I can’t say I have had any plastic remaining in the tile joints for many years now and once you master the easy technique, you won’t have trouble getting clean results either.
how to remove tile leveling clips from wall
Removing tile leveling clips from a wall is a similar concept to removing them from the floor. Simply use a rubber mallet and strike at the base of the clip. The key is to hit as low as possible to the tile to ensure the clip snaps off cleanly. Use considerable force so it snaps cleanly and once you got a few done, you’ll get a feel for it and will break off all the clips without any issues or broken clips.
Striking too high will result in the clip breaking above the grout line. (read below on how to remove broken tile clips).
• Am I a bad tiler for using tile leveling clips?
No, you are a wise tiler for using all the tools and inventions out there to achieve the best tiling result possible. Tiles are constantly changing with bigger and bigger sizes coming onto the marketplace, it is only natural that you need new tools to accommodate these new wall and floor tile.
See the section below for my answer/rant on that subject.
when to remove tile leveling clips
The question of “when can i remove tile leveling clips” is another common but nonetheless excellent question for every first time user of these systems.
A tile leveling clip should be removed after 24 hours or after the tile thinset has cured properly. Keep in mind that some thick bed adhesives may take longer, whilst quick drying thinsets are ready after only 2-3 hours. Use manufacturer guidelines as a general rule of thumb and if you are unsure, wait longer.
It’s key to never remove the tile leveling clips whilst the thinset is still wet. This is because any effect that leveling system may have on the tile will be ruined. The tile may slump down and create a lip or even bow back if it’s a wooden plank tile. Remember that a leveling clip physically holds a tile in place whilst the thinset cures. Until that thinset is hard, it needs that clip to hold the tile in place.
how to remove broken tile leveling clips
So you’ve gone and broken a tile leveling clip and it’s stucking above the grout line. What on earth do you do now?
Don’t worry, literally everyone that’s ever used a tile leveling system will have broken a tile leveling clip incorrectly. It’s a right of passage for every tile setter – you’re not alone.

A broken tile leveling clip can be removed by cutting the plastic tabs of the clip with a sharp utility knife. Tajima knives are my favorite for this as their super sharp amd long and thin enough to fit into the grout line. A box cutter shouldn’t be used as the blade is too short.
Simply insert your knife as far into the grout line as possible and cut along the plastic tabs of the leveling clip untill it breaks off. Three or four cuts along the same line should do it.
Professional Tiler Top Tip To Removing Broken Leveling Clips
Here’s one you won’t see on the internet as its a tip pioneered by the pro’s and passed around unofficially. (They’ll hate me for sharing this.)
If you have plenty of broken leveling clips to remove, you can heat the blade of your utility knife and cut them out much faster. A small blowtorch can be used to heat up the blade and then used to cut the plastic. It goes through like butter and makes the most tedious jobs a walk in the park.
*Please use extreme caution when using this method. Thick leather gloves and eye protection are recommended.*
Top Advantages Of Using The best tile leveling system
There are many advantages to using a tile leveling system, in fact their pros far out weight the cons.
Advantages of Using A Tile Leveling System:
- Easily level floor tiles
- Fine tune Wall Tile for perfect walls.
- Prevent tiles slumping during adhesive cure time.
- Save time fine-tuning tiles
- Straighten out crooked wooden plank tiles
- Prevent tile lippage once and for al
- Even grout lines
- No more clients calling you up about fixing a “lipping tile.” – Bet you’ve heard that one a few times.
Disadvantages of Using A Tile Leveling System:
- Costs a few bucks more
- Takes a few seconds more to lay a tile
- Adds time to clean up time when grouting
- Makes grout lines harder to clean
- One more tiling tool in your work vehicle.
Check Out The Best Tile Leveling Systems
Raimondi Leveling System


Spin Doctor Leveling System


Perfect Level Master Tile Levelers


Check Price – Raimondi Leveling System Starter Kit
Check Price – Spin Doctor Lippage Control Leveling
Check Price – T Lock TM Complete Lippage Leveling
Shop Related Products At Amazon.com


Leave a Comment
Your email address will not be published. Required fields are marked *
Comments are currently closed for new submissions.